Table Of Content
If you’re in the market for a new printer, check out our guide to the best art printers. You can print in color or grayscale, but all of your designs must be in the same color mode. You can’t mix color and grayscale elements in the same design.
Project Preview Screen
Select the visible rectangle and one of the floral frame layers. Hide one of each of the floral frame and photo layers. Make a duplicate of both the frame and photo layers. Prepare your frame and photo the same way as the main process, but don't Flatten the result. I'm using the circle frame this time and want to make a design that is 9.08" wide and x 9.25" tall since I really only want to deal with one seam. If you want to make a framed design larger than the Print then Cut area, you can with a few extra steps.
What kind of printer do I need to use with Cricut Design Space?
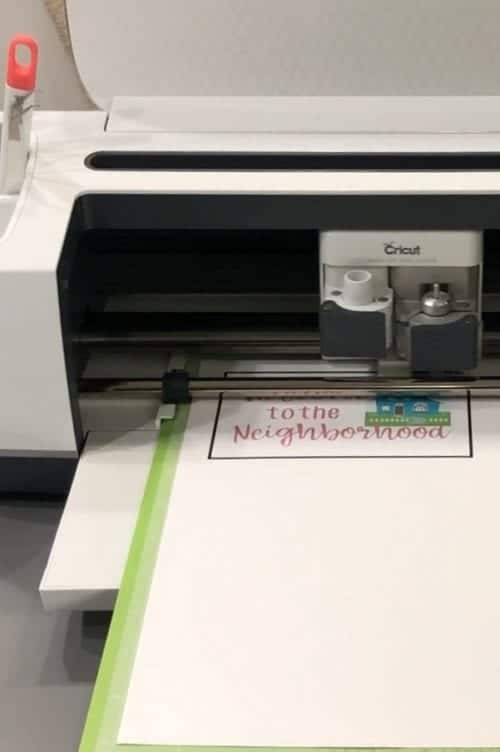
For most Print then Cut images in the Cricut Image Library, you will not be able to change the colors of the project. This is called Registration Marks or a Registration Box. Before you use Print then Cut for the first time, you’ll need to calibrate it. This ensures that your cuts will be around the edges of your printed image, and not offset incorrectly.
How to Print from Cricut Design Space
You could upload the PNG that comes with the file, but if you’d like to change any of the colors, you’ll want to start with the SVG. Then select both the image and the offset and click Flatten to make them one single printable image. You probably don’t want a black offset, so change it to white or whatever other color you want.
A paper trimmer helps remove all the white paper near the seam, which is really important to blend the parts of the photo. I’ll show you how to blend them even before the heat with a scraper. Even better, using a Cricut or other cutting machine in your sublimation process makes it possible to transfer designs to many different materials. Are you struggling to print from Cricut Design Space to your Epson printer? Many Cricut users face this issue and find it frustrating. But, with this step-by-step guide, you’ll be able to print your designs with ease.
Some of the most astonishing sticker sheets I’ve seen have all sorts of details outside the stickers. Click “Make it” and “Continue” to print and select material. One of the “You got this” is flattened, meaning I selected both layers and clicked “Flatten” at the bottom of the layers panel. You would most likely expect this project to cut around the white rectangle containing the text. Any paper will work, but we recommend using heavy cardstock for the best results. Select the correct paper type in the Print Settings dialog box so that your printer knows how to print your design.
Changing Mat Size
This versatile software offers an array of creative possibilities, including the option to print your designs. Hi I’m Naa Ardua, I make digital illustrations, svg files and clip art for hobby crafters and small businesses. I help crafters learn how to use digital art to make craft projects.
Check your mat
Next, select the frame in the layers panel and click the “Duplicate” button. For the main T-shirt project on white, 100% polyester t-shirts, you just need Sublimation Paper – I used A-Sub 8.5″ x 11″. Make sure your printer driver is installed correctly, and your printer is connected to your computer. Also, check if your printer has enough ink and paper. We've pre-programmed a long list of material cut settings in Design Space.
I was just able to figure out how to print and NOT cut shapes on sticker sheets. (I never would have figured it out on my own!) I am just wishing I had read this before I put together my sticker page. I did them in a square (6.75 x 6.75), so I am wasting a lot of expensive sticker sheet real estate. Place your project on the mat, load it to your machine and start the cut. The first layer is a rectangle with a “Print then Cut” operation and pattern as a “Print type.” The second layer is a “Flatten” layer of my stickers.
With a focus on "crafting tech," I've been sharing tutorials for crafters of all levels since 2004. Whether you're a seasoned crafter or just starting out, Hey Let's Make Stuff is your go-to resource for living a more creative and joyful life! In the Prepare Screen you’ll see your image on an 8.5″ x 11″ sheet with the black registration box around it. Play around with the settings until you have one you like.
Using the Arrange menu, select "Send To Back" so that the photo appears behind the frame layers. After you’ve chosen your printer and settings, click the “Print” button to start printing your design. Your Epson printer should start printing your design right away. With the bleed effect, you won’t have any white marks on the paper; without the bleed effect, you may have some white edges on the stickers. We will print the first and cut the stickers on the other.
One the halves are secure, use the same steps to prepare to press your design. When you place it face down on the shirt and have it taped in position, run your fingernail or a scraper over the seam to secure the overlapped areas. The layers of ink will press into each other and the fabric to blend a bit easier. When you’re working with photos, creating a crisp result is important. Preheating your t-shirts removes moisture and wrinkles (avoiding bumps and bleeds) and using a lint roller will remove any debris standing between you and a beautiful transfer. Securing the design in place with heat resistant tape keeps it still, and letting it cool for a few minutes afterward allows the ink to settle in place.
How to upload your own design with Cricut Joy - iMore
How to upload your own design with Cricut Joy.
Posted: Thu, 20 Aug 2020 07:00:00 GMT [source]
So, take some time to research the different options and find the best printer for Cricut Design Space and your needs. Printing from Cricut without cutting opens up a world of possibilities for your creative projects. Whether you’re using JPG, PNG, or SVG files, the print and cut feature allows you to make a variety of projects like stickers and decals. The next stage is sending your design to your printer. Just click Send To Printer, sit back and wait for your design to be printed out. Just another quick reminder that this only works with inkjet printers and we recommend using card stock or sticker paper when using a standard grip mat.
On the Prepare screen, make sure your mat says "Print Then Cut" and that the Material Size fits your sublimation paper. Make the other frame layer visible, by clicking the gray eye to the right. With that layer still selected, go to the Arrange menu and select “Bring to Front”. Select the other frame layer and in the Operation menu, select “Basic” under "Cut." The frame will turn to gray. Most Epson printers are compatible with Cricut Design Space. You can check the printer’s manual or manufacturer’s website to confirm.
And as the ink sublimates (turning from a solid, to a gas and back, skipping the liquid phase like magic) it can spread! So have your white cardstock and white butcher paper ready to catch any extra ink before it dyes your tools. Keep a window open and a fan running to dissipate the fumes, too.


No comments:
Post a Comment